Contents
Subscribe to our newsletter
Subscribe to the elia newsletter for exclusive product updates and industry best practices. You can unsubscribe at any time.
Thank you! You're subscribed.
Oops! Something went wrong while submitting the form.

.png)
%20(1).png)
It's 9 AM on a Monday morning, and five visitors arrive at reception at the same time. One forgot their ID. Another wasn't pre-registered. The desk staff is scrambling through paper sign-in sheets while fielding calls. Upstairs, hosts are waiting, unaware their guests have arrived.
Sounds familiar?
That’s what an unmanaged visitor management process looks like under pressure.
In this guide, we'll walk you through the full workflow, from the moment visitors arrive to when they depart, and explain why getting this right matters more than ever.
What you’ll get:
By the end, you’ll have a structured framework you can apply immediately, without overcomplicating your front desk operations.

A visitor management process is the workflow your office uses to welcome, track, and manage everyone who enters your facility. It spans everything from pre-arrival preparation through check-in, on-site presence, and final departure.
In practice, it answers a few simple questions every time:
Even a paper log technically answers those questions. It just becomes harder to manage during peak hours and harder to rely on during audits or incidents.
The structure of the visitor management process varies by industry and geography. A corporate office handles visitors differently from a manufacturing facility, just as European companies navigate different data privacy regulations than their American counterparts.
The framework remains consistent, but the level of risk doesn’t. If you’re also reviewing broader visitor management strategies across different environments, we’ve outlined those separately here.

Every office visit follows the same basic arc: someone plans to come in → they arrive → they check in → they move through the space → they leave. When that arc is handled consistently, reception feels calm. When it isn’t, though, small issues compound quickly.
Here’s the full visitor management flow we’ll use:
The biggest mistakes usually happen before step two.
A visitor management process begins before anyone walks through the door.
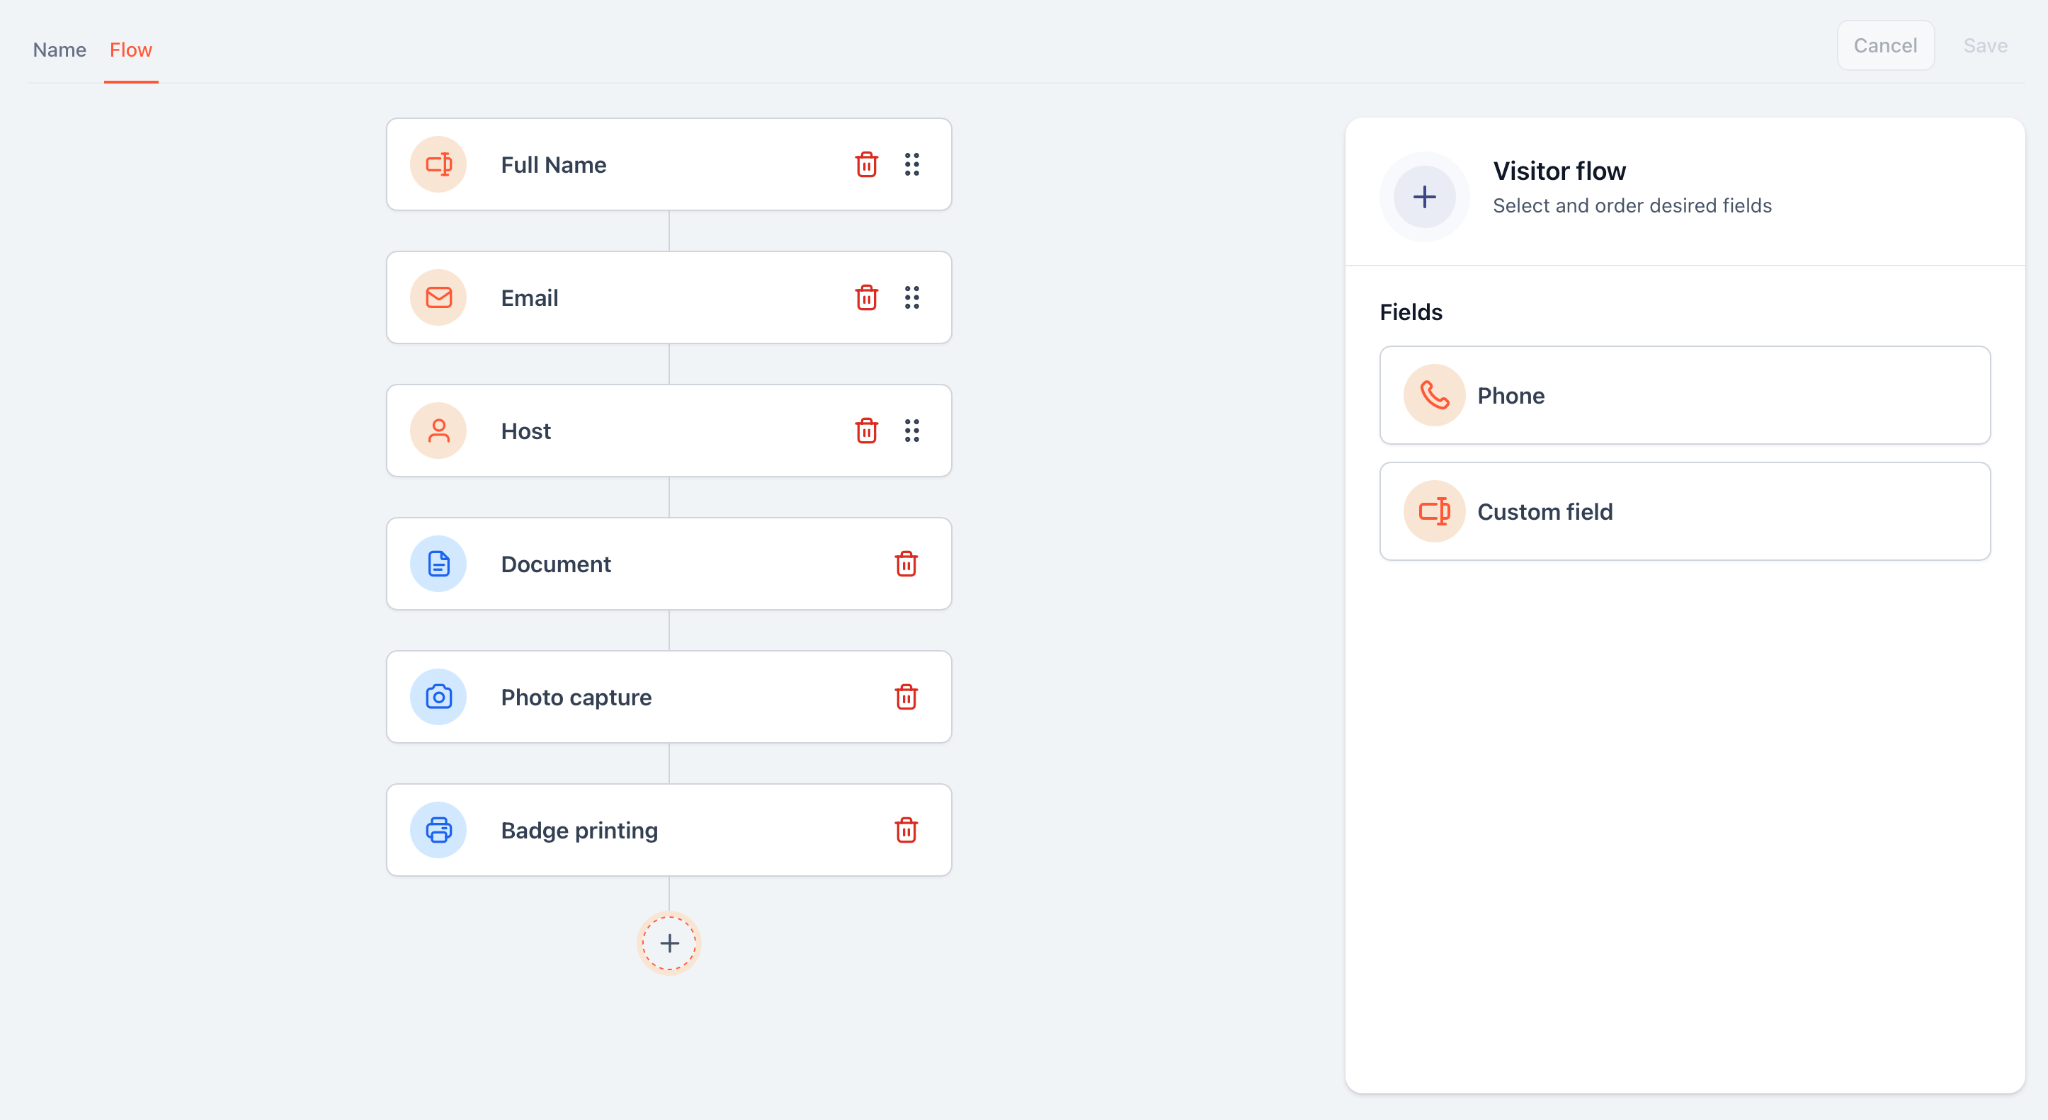
When a host schedules a meeting with someone external, that’s when the process should begin. Pre-registration should happen at that point, ideally 24 hours before the visit, and capture the information that reception and security will rely on later:
In manual setups, this information is often shared over email or added to a shared calendar.
In digital systems, it’s entered into the visitor management software. If it integrates with Outlook or Google Calendar, the visit can sync directly with the meeting invite. If it connects to access control, temporary credentials can be prepared before arrival, which reduces last-minute coordination between reception and the host.
Visitors shouldn’t have to guess how your office works. A short pre-arrival email removes friction and shortens the check-in process. Here’s what that communication should contain:
Send the confirmation immediately after pre-registration, while the meeting is still top of mind. A reminder 24 hours before is usually enough to prevent confusion. For early morning meetings, sending a brief same-day reminder can help avoid last-minute calls to reception asking where to go.
While hosts handle pre-registration, the reception should have visibility into the day. A short morning review prevents most avoidable issues:
If equipment fails during peak arrival time, the entire front desk slows down. Meeting room confirmation matters just as much. Escorting a visitor to a room that's already occupied undermines confidence before the meeting even starts.
Even with preparation, gaps happen, so come prepared with your visitor policy. Here are just some examples:
%2520(1).png)
Pre-arrival preparation doesn’t feel urgent, which is why it’s often rushed. But when this step runs properly, the rest of the visitor management process becomes predictable.
This is the first visible moment of your visitor management process.
Up to this point, everything has happened behind the scenes. When a visitor walks into reception, within seconds, they form an impression of how your office operates. The first 30 seconds matter more than most teams realize because they set expectations.
Acknowledgment should happen quickly, even if reception is assisting someone else. A brief signal that the visitor has been seen keeps the flow orderly and prevents uncertainty. Silence, on the other hand, creates it.
Once available, reception should move the visitor into the check-in process. The interaction depends on the situation:
From there, direct the visitor to the check-in method your office uses:
Pre-registered visitors move through this quickly because their information is already available. Walk-ins require more manual steps, which is why strong pre-registration habits make a noticeable difference during peak periods.
Your objective at this stage is to keep the visitor flow moving without lowering security standards.
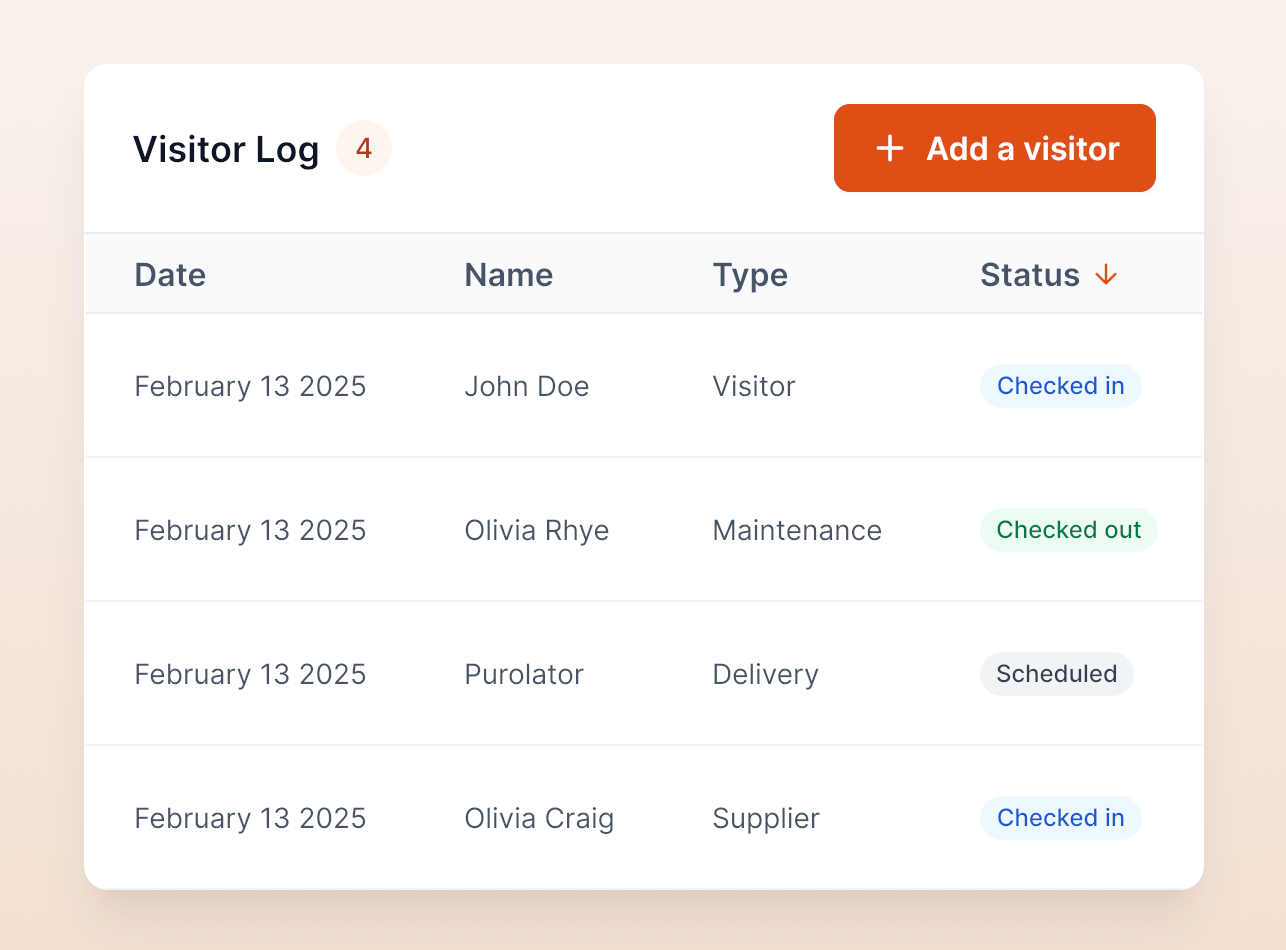
By this stage, the visitor has been greeted and directed to sign in. Now you need to confirm who they are, why they’re there, and document the visit properly. You want the process to move quickly, but you also need a record that makes sense later if someone asks for it.
A visitor check-in process should capture:
If NDAs, safety waivers, or other legal documents apply, those should be presented at this stage as well. A badge is then issued with clear identification and, ideally, an expiration time.
In a manual setup, the visitor signs a paper log, reception contacts the host, and a badge is issued by hand. The process works, but it takes longer and depends more heavily on handwriting accuracy and how busy the desk is at that moment.
In an effective visitor management system, the visitor typically confirms their details on a tablet or kiosk. The system may capture a photo, present documents for electronic signature, print a badge automatically, and notify the host instantly. When pre-registration is done properly, it takes less than a minute because most of the information is already there.
Information that doesn’t clearly serve a purpose (like sensitive personal identifiers unrelated to the visit) usually doesn’t belong on a standard visitor form. If you can’t explain why a field exists, it likely shouldn't be in the visitor management process.
There isn’t a single federal rule in the U.S. that dictates exactly how long visitor logs must be kept. Retention depends on your security needs and any regulatory obligations that apply to your organization.
Some offices keep basic logs for a short window to support emergency tracking. Others retain records longer for audit or compliance reasons, especially when contractors or regulated environments are involved.
What matters is that the retention period is defined and aligned with applicable privacy requirements.
Once a visitor has checked in, the badge becomes the visible confirmation they’re authorized to be there. A well-designed visitor badge does two things at once: it helps employees identify visitors quickly, and it limits where those visitors can go.
At a minimum, a visitor badge should display:
Badges should be worn visibly, not tucked into a pocket or clipped to a bag. If employees have to guess whether someone belongs, the system isn’t doing its job.
In a manual environment, reception prepares badges in advance or writes them by hand during check-in. This works at low volume but can slow down the desk during busy periods.
In a digital setup, badges are printed automatically once check-in is completed. Information pulls directly from the registration record, reducing handwriting errors and keeping badge formatting consistent.
After check-in and badging, the next question is where the visitor can actually go. Of course, not everyone needs the same level of access:
Not all visitors need constant escorts, too. The level of supervision should match the risk of the environment. In higher-risk areas such as server rooms, R&D labs, executive floors, or spaces with confidential discussions, escorting is typically required. In general office areas, a host may walk a visitor to a meeting room and remain responsible without constant supervision.
If your visitor management system connects to your access control system, temporary credentials can be tied directly to the visit. That means access is granted only for approved areas, credentials expire automatically, and entry and exit through controlled doors are logged. That reduces manual follow-up and lowers the risk of access lingering after departure.
Once the visitor has checked in, someone needs to let the host know they’ve arrived.
In smaller offices, this often means receptionists calling or messaging the host directly.
Automatic notifications eliminate the awkward scenario of guests lingering in your lobby, wondering if anyone knows they've arrived. Modern visitor management solutions send instant host notifications via SMS, email, Slack, or Teams the moment someone checks in. The front desk doesn’t need to chase anyone.
The delivery is instant, but the response time depends on the host. For that reason, many offices use more than one notification channel or define a simple escalation process. For example, if there’s no response within a few minutes, the system can notify a backup contact like an assistant or team lead. That keeps the front desk focused on welcoming the next visitor.
Surprisingly, the last step in the visitor management process is often the one that gets skipped.
In a manual setup, the visitor returns to reception, signs out, and returns the badge. Reception updates the log and stores the badge for reuse. The problem is simple: people forget. Meetings can run long, and visitors can leave through a side exit. The sign-out step is easy to miss.
In a good visitor management system, check-out can happen at a kiosk, through a mobile prompt, or automatically based on time or exit data. Access credentials can expire at the end of the visit without someone having to remember to revoke them.
Regardless of the method, a few things should happen at departure:
If a visitor is still marked as on-site well past their scheduled departure, someone should confirm whether they’ve left. That may mean contacting the host or checking access logs. The point is to prevent your records from drifting away from reality.
The process is one thing. The structure behind it is another.
If you’d like to see how this works in practice, you can watch the short walkthrough video above. If you prefer reading, here’s how the system is typically organized.
Many visitor management systems are built in layers: sites, visitor categories, documentation, front desk setup, notifications, badging, and logging. Once those pieces are defined, the process tends to run as planned.
Most organizations operate across different types of spaces. A corporate office, a lab, and a manufacturing facility don’t share the same entry requirements.
That’s why configuration begins at the site level. Each site represents a physical location where baseline rules are defined. For example:
Setting rules at the site level keeps requirements consistent without creating separate informal processes for each location.
Clients, candidates, contractors, delivery drivers, and maintenance staff don’t require the same workflow. Categories allow the system to adjust automatically once the visitor type is selected.
For each category, you can define:
Once the category is selected, the rest of the visitor flow follows from there.
Documentation is where manual systems often break down. Instead of handling NDAs or safety forms separately, attach them directly to visitor categories. When that visitor checks in, the required document appears automatically and is recorded as part of the visit.
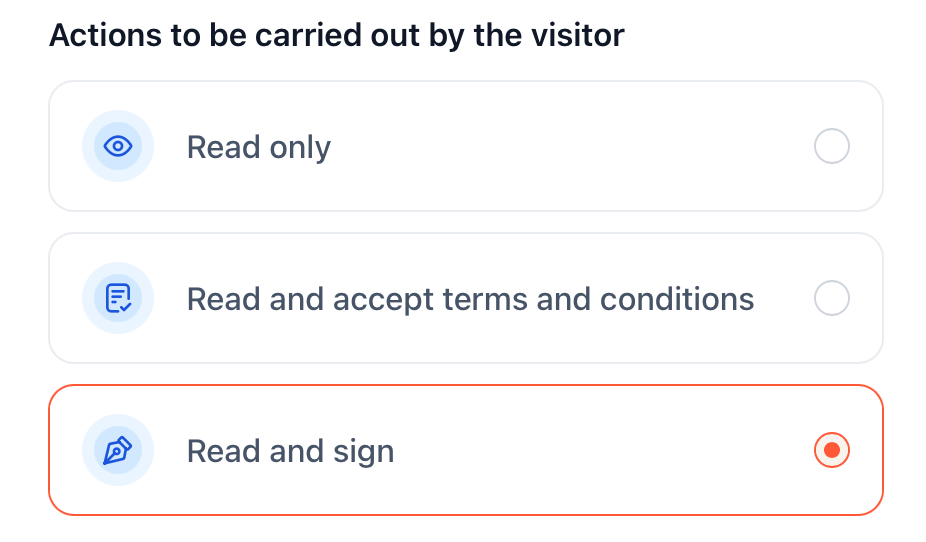
Photo capture, if required, becomes part of the same record and can be printed on the badge.
Once sites and categories are defined, you configure the front desk interface.
Each kiosk is tied to a specific site. From there, you control what visitors see first, which categories are available, and how the screen looks and reads.
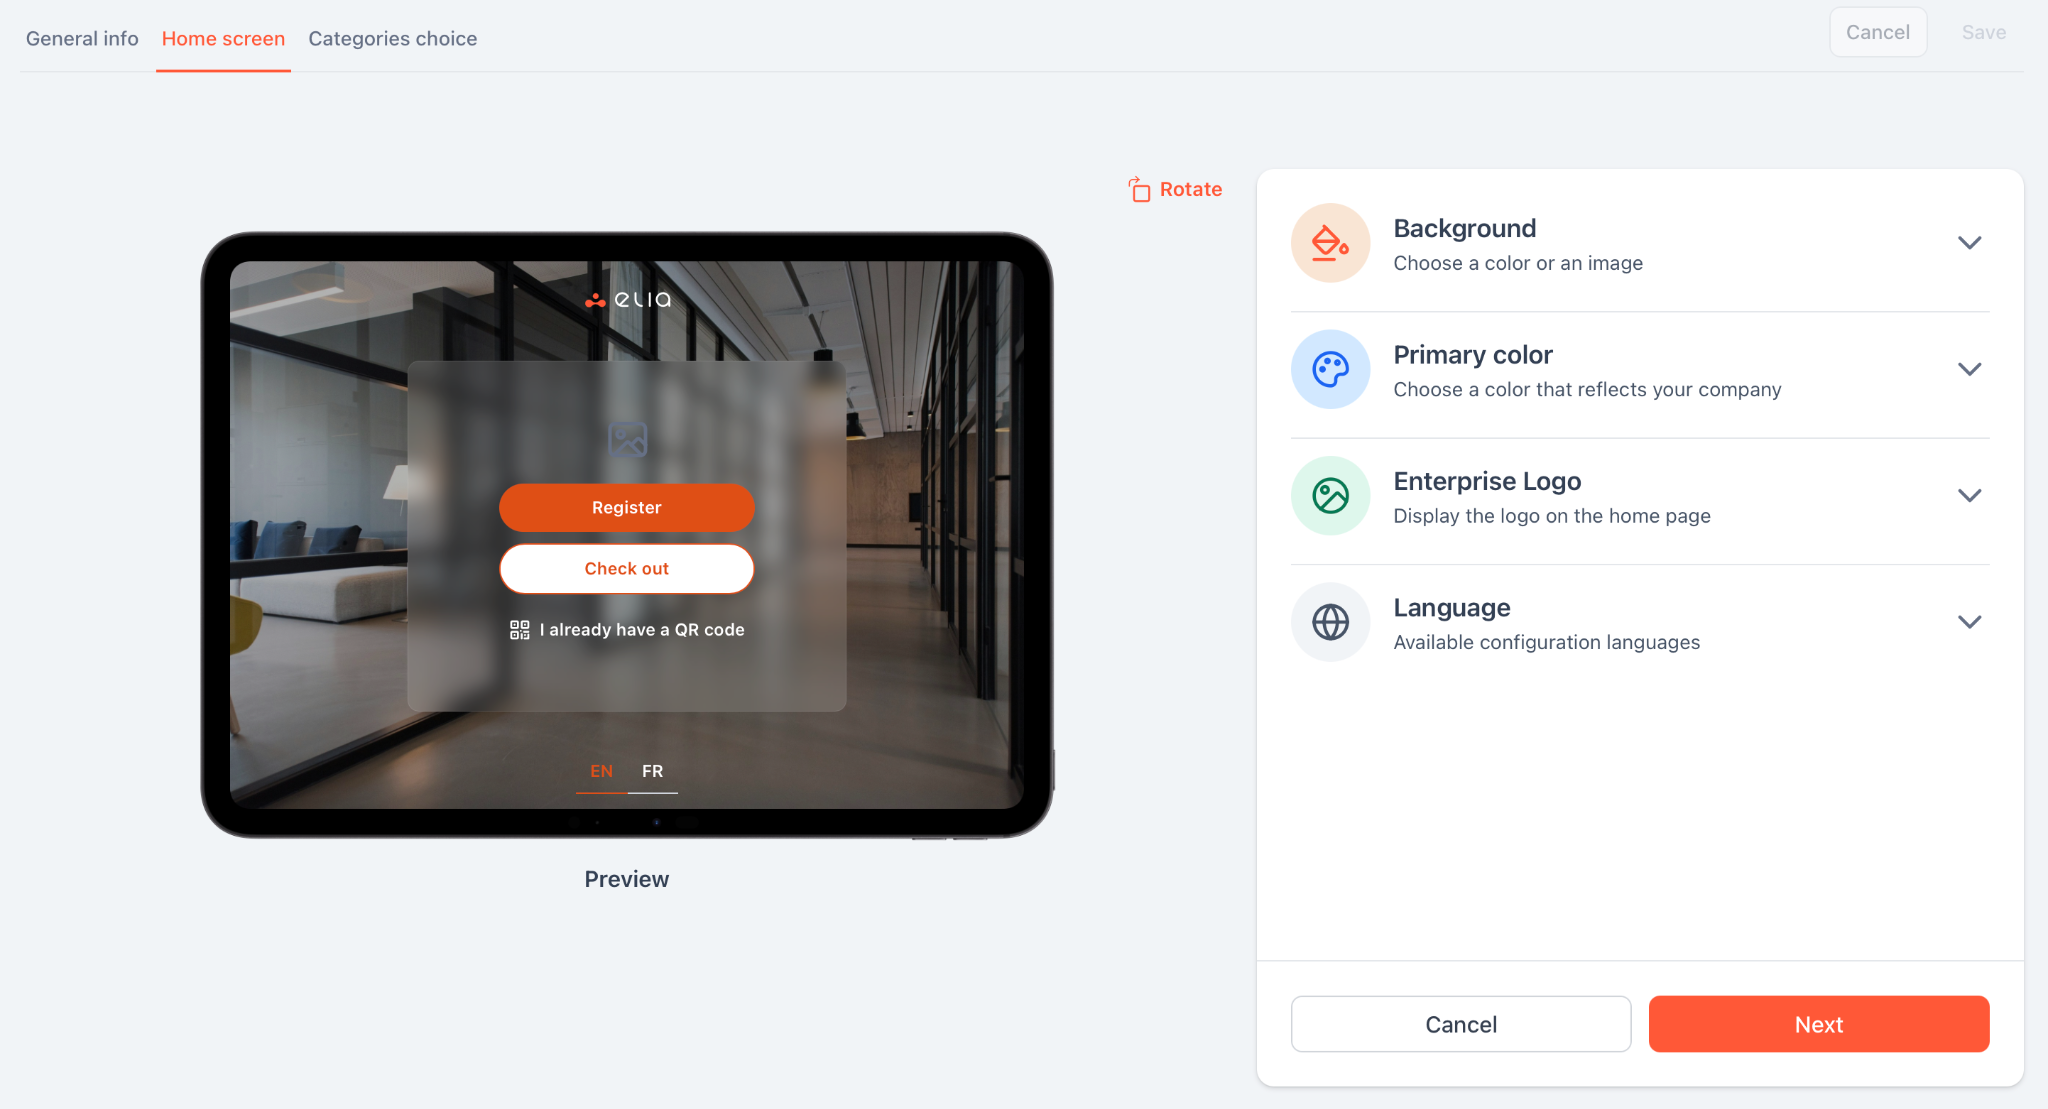
A public lobby doesn’t need the same setup as a restricted facility entrance. The interface can reflect the location without changing the underlying structure.
Host notification and badge printing should be part of the same flow as check-in.
When a visitor completes registration, the selected host is notified automatically, and the arrival is time-stamped. Badge details can be sent directly to a connected printer without re-entering information.
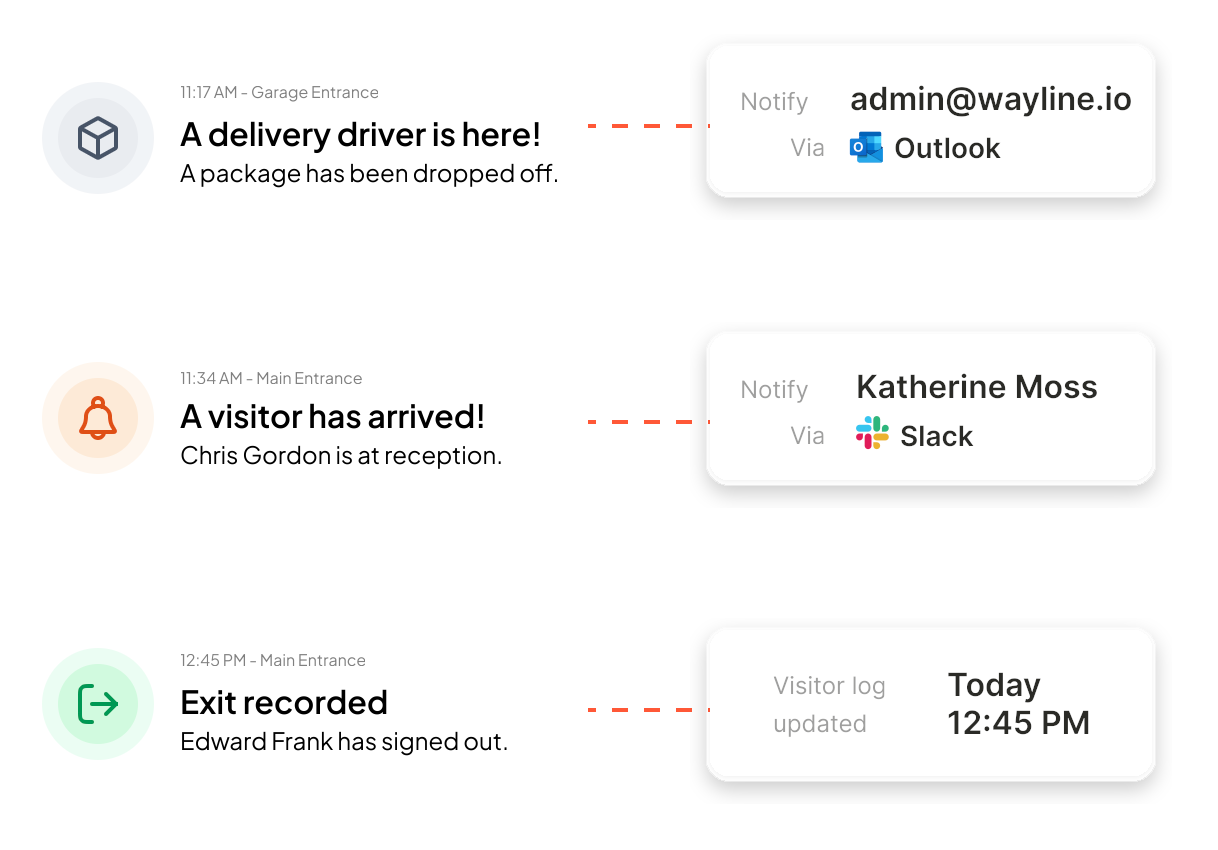
Because both actions are triggered by check-in, they remain tied to the visit record.
Behind the front desk, the system maintains a live record of activity, including expected visitors, active check-ins, check-out times, visitor category, host, and signed documents. This provides visibility into who is on site and preserves a reliable historical record.
Manual visitor management can work, but only in certain environments.
If you’re running a single office (with <25 employees), seeing fewer than 10 visitors per week, and don’t have formal compliance requirements, paper logs and printed badges may be enough. Especially when reception is staffed throughout the day, and there’s no need to integrate with access control or centralized reporting.
In that context, traditional processes work when they’re structured. That usually includes:
But without that discipline, manual systems drift into informality, and that’s where strain begins. You start seeing the same issues repeat:
At low volume, these are manageable inconveniences, but as traffic increases, they start to affect operations, especially during audits or emergency situations.
A digital visitor management system doesn’t replace your visitor policy but rather applies it consistently.
The steps remain the same: pre-registration, check-in, badging, notification, access control, checkout. What changes is how reliably those steps happen.
Pre-registration can happen directly inside calendar invites. Visitors check in through a kiosk or QR code instead of filling out a paper log. Badges print automatically with expiration times. Hosts are notified instantly. Access permissions can sync with door systems. Checkout can revoke credentials without anyone remembering to do it manually. Visitor records become searchable instead of archived.
Digital becomes difficult to avoid when:
At that stage, manual systems require oversight. And the more oversight required, the more fragile the process becomes.
For some organizations, the threshold is volume: 40 or 50 visitors per week. For others, it’s compliance or security expectations. In higher-risk environments, digital access control integration is less about convenience and more about accountability.
If you move to digital visitor management, the system should support the process you’ve already defined. It should cover the following essential features:
Digital systems reduce repetitive work and centralize documentation, which often becomes visible quickly in daily operations. Many visitor management platforms pay for themselves within months through time savings alone. If you're ready to look at numbers, here is a breakdown of visitor management system costs.
Look back at the 7 steps above and compare them to what happened at your front desk this morning. If you see gaps in security or spots where your team is losing time, those gaps can be structured out of the process.
elia automates the entire journey from Step 1 to Step 7. By handling everything (from pre-registration and self-service kiosks to instant Slack/Teams notifications), it removes the friction from your lobby. With deep integrations, it fits right into the digital tools you already use. It’s why over 100,000 employees at companies like Québecor and Fasken trust us to handle their visitor experience.
Book a demo with elia to see how professional visitor management should work. Your next visitor arrives tomorrow morning, so make sure you're ready for them.
Answers to Your Common Queries
%20(1).png)

.png)